---
title: Wordpress
url: 'https://faq.servetheworld.net/myserve/en/webhotell/wordpress'
markdown: 'https://faq.servetheworld.net/myserve/en/webhotell/wordpress.md'
lang: en
date: '2026-09-17'
description: 'Here you will find answers to the most common questions related to your WordPress. This shows how to get quickly started with your domain name and a website based on WordPress (read more about WordPress at WordPress.org) Installation of WordPress Logging in to WordPress Activate AccelerateWP …'
taxonomy:
category:
- docs
---
[](#)- [Norsk](https://faq.servetheworld.net/myserve/no/webhotell/wordpress)
- [English](https://faq.servetheworld.net/myserve/en/webhotell/wordpress)
[ STW Knowledge Base ](https://faq.servetheworld.net/myserve/en) [ Web hosting ](https://faq.servetheworld.net/myserve/en/webhotell) Wordpress
# Wordpress
> > > Here you will find answers to the most common questions related to your WordPress.
> > > This shows how to get quickly started with your domain name and a website based on WordPress (read more about WordPress at [WordPress.org](https://wordpress.org))
[Installation of WordPress](#installasjon-av-wordpress)
[Logging in to WordPress](#wp-login)
[Activate AccelerateWP](#activate-acceleratewp)
[Activate Object Cache (AccelerateWP Premium)](#activate-acceleratewp-premium-redis)
[Create a staging site of your WordPress with WP Toolkit](#create-wp-staging)
[Updating WordPress, plugins, and themes](#oppdatering-av-wordpress-plugins-og-themes)
[Delete unused modules, themes, and media](#slett-moduler-temaer-og-medier-som-ikke-er-i-bruk)
[WP-CLI](#wp-cli)
#### Installation of WordPress with WP Toolkit
1. Log in to
2. Click on **Products**
3. Click on **My Products**
4. Click on **Manage** next to the relevant web hosting
5. Click on **Plesk** (a new tab will open in your browser)
6. Click on **WordPress** in the menu on the left
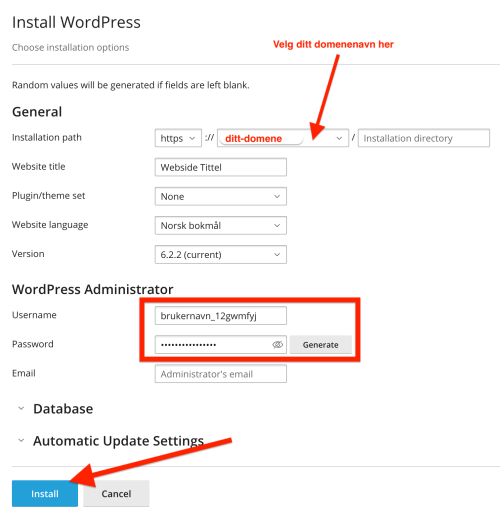
7. Click on **Install** to install WordPress
8. Select the relevant domain name in the **Installation Path** field
9. **IMPORTANT!** Note down the username and password for later use when logging into WordPress.
- You can change the username and password fields – create a strong password so that unauthorized users cannot misuse or change the content of your WordPress website.
10. Enter your email address in the **Email** field
11. Click on **Install**
12. **WordPress** will now be installed and ready for login at, for example, **your-domain.com/wp-admin** – (*Replace **your-domain.com** with your own domain name*)
13. [Logging in to WordPress](#wp-login)
| WordPress Setup | WordPress is being installed |
|---|---|
| [](https://faq.servetheworld.net/myserve/images/4/f/e/6/2/4fe6267f49a4979b5833a461bd9988ea6ae0a4b1-installwp02.png) | [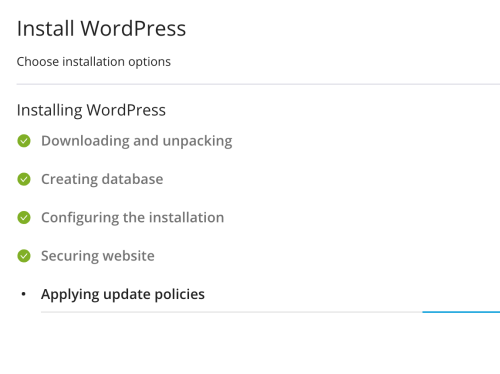](https://faq.servetheworld.net/myserve/images/e/4/7/7/2/e477234ee33a008648197ce4ba87cd51222a7327-wptoolkit-install-process.png) |
#### Logging in to WordPress
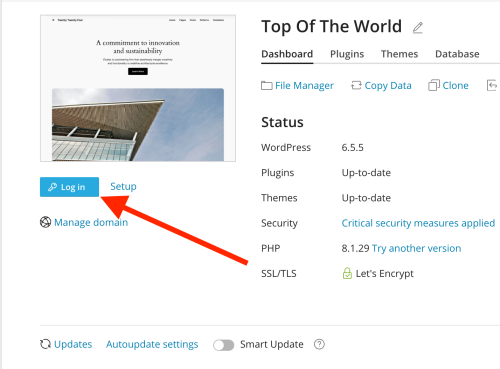
You can log in to WordPress by clicking the **Log In** button (see image example below).
Alternatively, you can log in directly via your browser by going to your address, e.g., **your-domain.com/wp-admin** – (*Replace **your-domain.com** with your own domain name*)
1. Log in to
2. Click on **Products**
3. Click on **My Products**
4. Click on **Manage** next to the relevant web hosting
5. Click on **Plesk** (a new tab will open in your browser)
6. Click on **WordPress** in the menu on the left
7. Click the **Log In** button
| Login with WP Toolkit | Login via URL - *Replace **your-domain.com** with your own domain name* |
|---|---|
| [](https://faq.servetheworld.net/myserve/images/5/d/7/a/8/5d7a8011e1254b9442cddcbbd07b319966f93e3d-wp-toolkit-sso-login.png) | [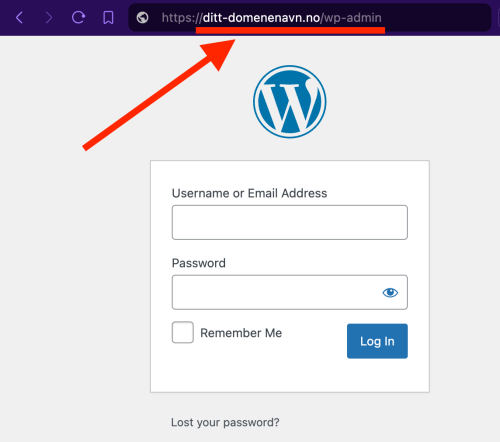](https://faq.servetheworld.net/myserve/images/3/8/0/e/c/380ecf1b728c4850c6b10edfc3f9abe31485e091-wp-login-example.png) |
#### Activating AccelerateWP
AccelerateWP makes your website load faster and provides better response times, resulting in an improved user experience.
1. Log in to
2. Click on **Products**
3. Click on **My Products**
4. Click on **Manage** next to the relevant web hosting
5. Click on **Plesk**
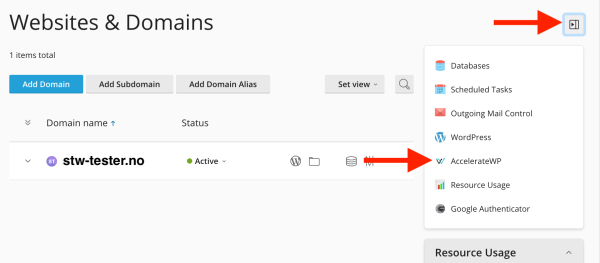
6. On the Websites & Domains page, click on **AccelerateWP**
7. Click the gear icon under **AccelerateWP**
| Click on AccelerateWP | Click the gear icon |
|---|---|
| [](https://faq.servetheworld.net/myserve/images/a/c/5/8/3/ac5832238081c64aa3be64852bc436ceca990503-acceleratewp01.png) | [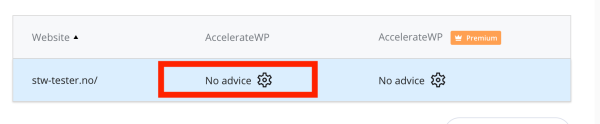](https://faq.servetheworld.net/myserve/images/7/e/2/9/d/7e29d7a81269f5787e6da303c3f44170f6763b10-acceleratewp9.png) |
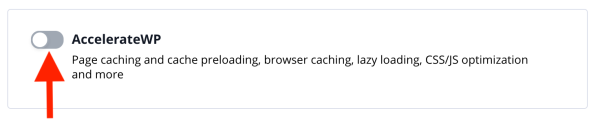
7. Activate **AccelerateWP**
| Click the button to activate AccelerateWP | AccelerateWP is now active on your WordPress site |
|---|---|
| [](https://faq.servetheworld.net/myserve/images/8/d/8/1/2/8d812dd29f00dbaf32800f9906efb663abdaa246-acceleratewp07.png) | [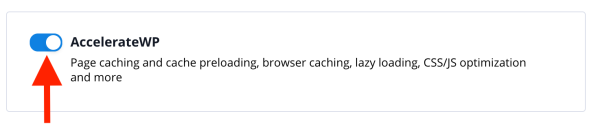](https://faq.servetheworld.net/myserve/images/d/8/e/a/4/d8ea425b25fd1e08630e48bb97f35a9fd8feb500-acceleratewp05.png) |
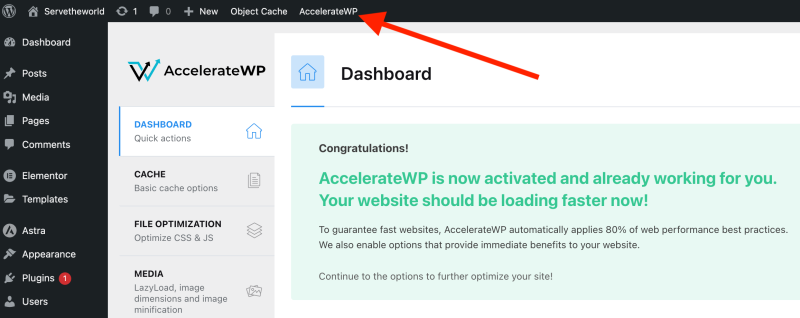
8. In the WordPress Dashboard, it is also possible to see the status of AccelerateWP and customize AccelerateWP, including changing cache lifetime, excluding pages from cache, and image optimization.
[](https://faq.servetheworld.net/myserve/images/f/9/5/c/6/f95c615c6d9d0033024ba8080392eeda57d3c656-acceleratewp08.png)
#### Activate Object Cache (AccelerateWP Premium)
Object Cache is a performance optimization technique that stores frequently used data in memory. Instead of retrieving data from the database every time a user visits your site, Object Cache can deliver this data much faster, significantly improving the page load time.
1. Log in to
2. Click on **Products**
3. Click on **My Products**
4. Click on **Manage** next to the relevant web hosting
5. Click on **Plesk**
6. On the Websites & Domains page, click on **AccelerateWP**
7. Click the gear icon under **AccelerateWP PREMIUM**
| Click on AccelerateWP | Click the gear icon under AccelerateWP PREMIUM |
|---|---|
| [](https://faq.servetheworld.net/myserve/images/a/c/5/8/3/ac5832238081c64aa3be64852bc436ceca990503-acceleratewp01.png) | [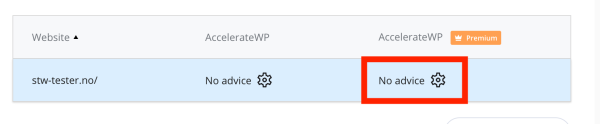](https://faq.servetheworld.net/myserve/images/9/e/1/4/8/9e148bd913b96fef7544ba3d2dc848e6a4a915bc-acceleratewp10.png) |
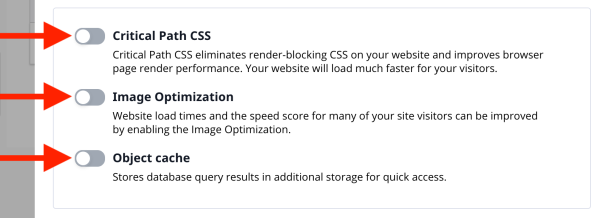
7. Activate **Object Cache**, **Image Optimization**, and **Critical Path CSS**
| Click to activate all AccelerateWP PREMIUM features | All AccelerateWP PREMIUM features are now active |
|---|---|
| [](https://faq.servetheworld.net/myserve/images/5/8/0/f/b/580fb0f2e50cccae5a0c3a52ad7c0e762995af29-acceleratewp11.png) | [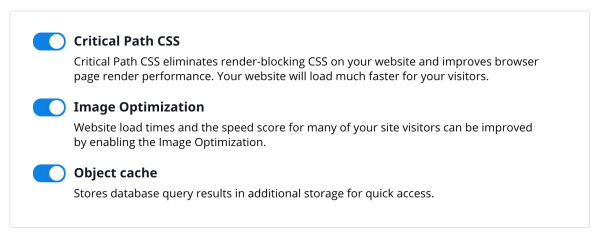](https://faq.servetheworld.net/myserve/images/a/7/1/9/e/a719e4db406de2c77d86ef19494a6644b172246b-acceleratewp12.png) |
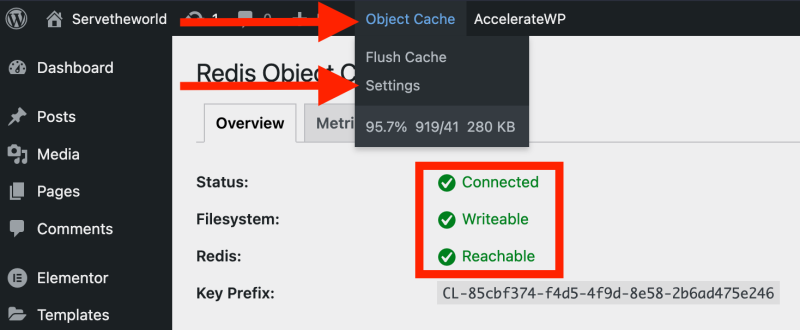
8. In the WordPress Dashboard, you can see the status of Object Cache at any time.
[](https://faq.servetheworld.net/myserve/images/7/0/d/2/c/70d2ca58d24fef944134fa58fb3cb1e4a927e9d8-acceleratewp13.png)
#### Creating a staging site of your WordPress with WP Toolkit
Here we show how to easily create a copy of your WordPress site, so you can test updates or design changes before performing the same changes on the main site. Changes on a staging site will not affect the content on the main site.
1. Log in to
2. Click on **Products**
3. Click on **My Products**
4. Click on **Manage** next to the relevant web hosting
5. Click on **Plesk**
6. Click on **WordPress** in the menu on the left
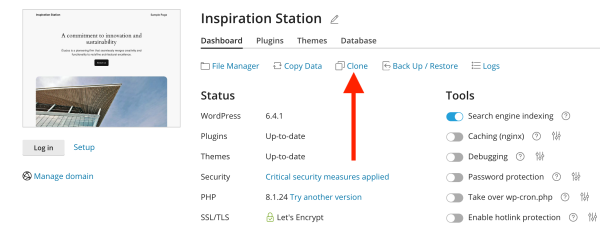
7. Find the relevant website in WP Toolkit and click the **Clone** button
8. Make sure to select **Create subdomain** (see image below). Note the name of the subdomain, e.g., *staging*.
- If desired, you can change the name of the subdomain from staging to, for example, test or something else you easily remember.
- In the example below, the staging site will be available at the web address **staging.tester.plesk1**
9. Click **Start** to create the staging site.
| | |
|---|---|
| [](https://faq.servetheworld.net/myserve/images/2/4/6/f/a/246faf3b528fed1952ca674c0a730a9a74dce0cd-clonewp01.png) | [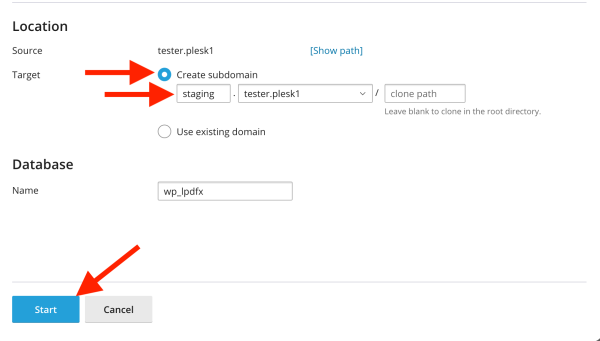](https://faq.servetheworld.net/myserve/images/4/5/e/3/7/45e37c02ba813fe265bc142239d22cdb2d13c663-clonewp02.png) |
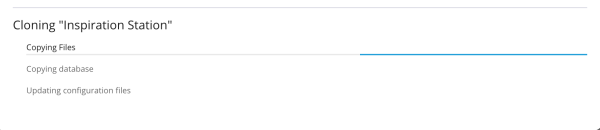
9. The staging site is now being created. It may take a few minutes depending on the content in WordPress and the size of the database.
10. Click **Close** when the copying is complete. You can now go to the web address for the staging site and log in with the same WordPress username as on the main site.
| | |
|---|---|
| [](https://faq.servetheworld.net/myserve/images/4/6/e/b/f/46ebfa6e9c2414b252973503b44f996e309a96a6-clonewp03.png) | [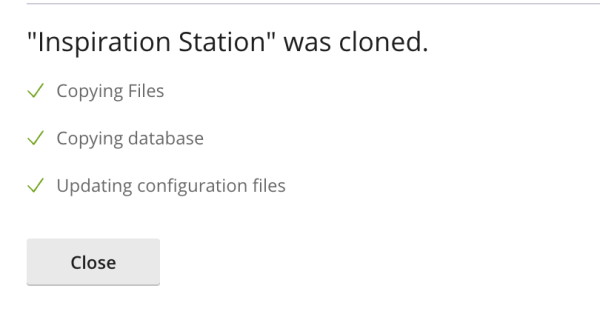](https://faq.servetheworld.net/myserve/images/0/1/5/d/d/015dd640414d8ccbc32ac5c2721efc4481fdd5e6-clonewp04.png) |
#### **Updating WordPress, plugins, and themes with WP Toolkit**
Security and protection of the website must be performed routinely/continuously.
As a website owner, it is your responsibility to keep the WordPress installation, theme, and plugins updated to the latest versions. If this is not done regularly, the website may become slow, unreliable, and potentially vulnerable to security threats.
1. Log in to
2. Click on **Products**
3. Click on **My Products**
4. Click on **Manage** next to the relevant web hosting
5. Click on **Plesk**
6. Click on **WordPress** in the menu on the left
7. Find the relevant website in WP Toolkit
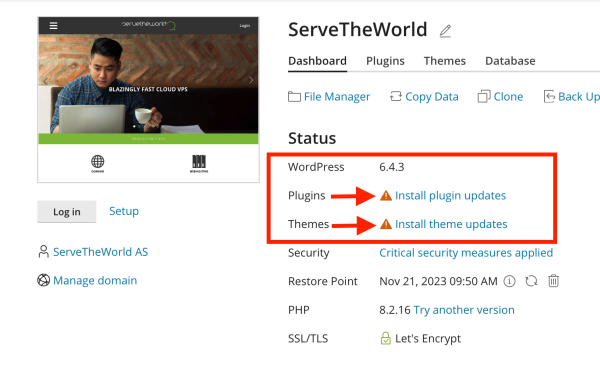
8. Click on either **Install plugin updates** or **Install theme updates**
9. Then select the relevant plugins or themes you wish to update
- Generally, we recommend updating one module/theme at a time and checking the website after each update.
10. Click the **Update** button to start the update
11. The message **All selected items were updated successfully** will appear when the update is complete.
| | |
|---|---|
| [](https://faq.servetheworld.net/myserve/images/0/8/d/5/f/08d5fd4d5553ca2a73d5616fc8eca235744703ce-wptoolkitupdate01.png) | [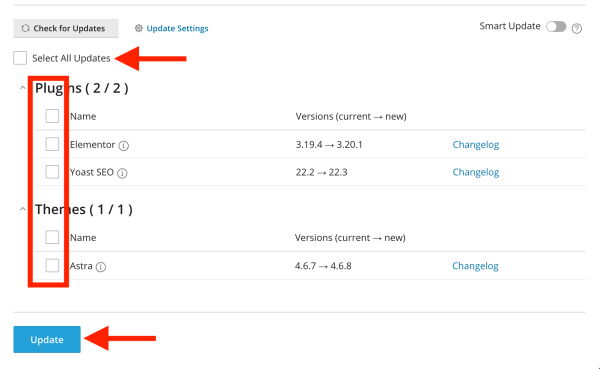](https://faq.servetheworld.net/myserve/images/a/9/8/c/b/a98cb790afe65f4154f3a9105abaefcf58fa9b27-wptoolkitupdate02.png) |
#### **Delete unused modules, themes, and media**
> > > > > > Ideally, delete plugins and themes that are not in use, rather than just deactivating them.
- Not only do unused plugins and themes take up space on your site, they also present a higher risk of security vulnerabilities on the website.
- We recommend that you delete plugins and themes that you do not use.
- You can remove media manually by simply navigating to *“Media”* → *“Library”*. Here, you highlight the media you don't use and select *“Delete permanently”* from the dropdown menu.

#### WP-CLI
WP-CLI is available on our WordPress web hosting packages by logging in via SSH:
```bash
PHP8.0
# /opt/plesk/php/8.0/bin/php /opt/clwpos/wp-cli
PHP8.1
# /opt/plesk/php/8.1/bin/php /opt/clwpos/wp-cli
PHP8.2
# /opt/plesk/php/8.2/bin/php /opt/clwpos/wp-cli
```
[ ](https://faq.servetheworld.net/myserve/en/webhotell/epost/oppsett-pa-iphone-ipad) [](https://faq.servetheworld.net/myserve/en/webhotell/databases)
---
## Navigation
- Parent: [Web hosting](https://faq.servetheworld.net/myserve/en/webhotell.md)
- Previous: [Email](https://faq.servetheworld.net/myserve/en/webhotell/epost.md)
- Next: [Install app with Softaculous](https://faq.servetheworld.net/myserve/en/webhotell/shared-softaculous.md)