STW Mail
Create email account
Webmail
Connect your domain to STW Mail - DNS records
Setup your email client on PC/smart phone/tablet
Change language in Webmail
This page explains how to create your new ServeTheWorld mailbox, configure your domain, and manage additional addresses such as aliases and forwarding.
This is your foundation: your own inbox, on your own domain.
For a more narrative explanation with examples, see our blog post: Getting Started with STW Mail: One Inbox for All Your Emails
Supported Standards and Reference Guides
STW Mail (based on Open-Xchange App Suite, cloud edition) supports:
- IMAP, SMTP, POP for email
- CalDAV for calendars
- CardDAV for contacts
For more detailed information about the platform, see the official Open-Xchange resources: OX App Suite User Guide (PDF) OX Online Documentation
Ordering and Domain Setup
- Go to https://my.servetheworld.net/order/stw-mail/
- Choose your plan (60-day trial, Mail, or Productivity).
- Register a new domain, transfer an existing one, or use a domain you already own.
- Complete the order. You will receive a confirmation when your mailbox is provisioned.
Control Panel — Accounts, Aliases, Forwarding
After provisioning, log in at https://my.servetheworld.net → Products → My Products → Manage.
- Email Accounts – create new mailboxes on your domain.
- Aliases – assign alternate addresses that deliver into the same inbox.
- Forwarding – forward messages from one STW address to another address (internal or external).
- Catch-All – collect all mail sent to addresses under your domain that do not exist.
Notes:
- Aliases and forwarding are configured in the Control Panel.
- Inside Open-Xchange webmail, you can also define personal rules (Settings → Mail → Rules).
Create email account
- Log in at https://my.servetheworld.net
- Click on Products
- Click on My Products
- Click on Manage for the STW Mail product
- Click on Email Accounts
- Click on Create Account
Webmail
When your email account is created, you can log in to webmail at https://mail.stw.no using your email address as the username and your custom password.
Install the webmail app on your computer
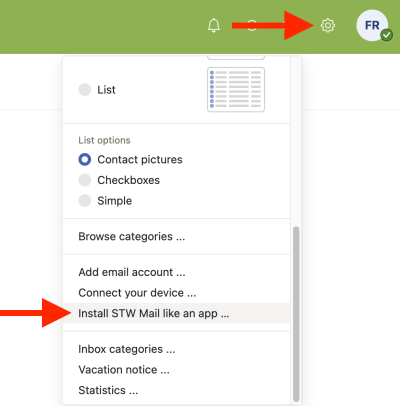
Log in to webmail at https://mail.stw.no Click the gear icon in the top right corner Click on Install STW Mail like an app
Connect your domain to STW Mail - DNS records
To connect your domain to STW Mail, you must create or update DNS records on your domain name so that your domain points to the STW Mail service.
MX records
| Hostname | Data |
|---|---|
| @ | mx001.servetheworld.xion.oxcs.net |
| @ | mx002.servetheworld.xion.oxcs.net |
| @ | mx003.servetheworld.xion.oxcs.net |
| @ | mx004.servetheworld.xion.oxcs.net |
TXT record
| Hostname | Data |
|---|---|
| @ | v=spf1 include:spf.cloudeu.xion.oxcs.net ~all |
SRV records
| Hostname | Data |
|---|---|
| _imaps._tcp | 0 0 993 imap.stw.no |
| _pop3s._tcp | 0 0 995 pop.stw.no |
| _smtps._tcp | 0 0 465 smtp.stw.no |
| _submission._tcp | 0 0 587 smtp.stw.no |
Setup your email client on PC/smart phone/tablet
IMAP setup
| User name | Your email address e.g. post@your-domain.com |
| Password | Your email password |
| IMAP server/hostname | imap.stw.no |
| IMAP port | 993 |
| IMAP connection type | SSL/TLS |
SMTP setup
| User name | Your email address e.g. post@your-domain.com |
| Password | Your email password |
| SMTP server/hostname | smtp.stw.no |
| SMTP port | 465 |
| SMTP connection type | SSL/TLS |
Change language webmail
- Log in to webmail at https://mail.stw.no
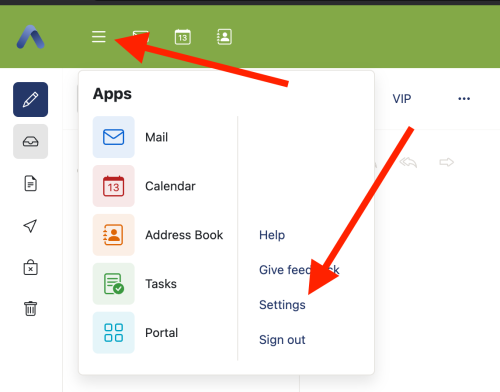
- Click the Menu button
- Click on Settings
- Click on General
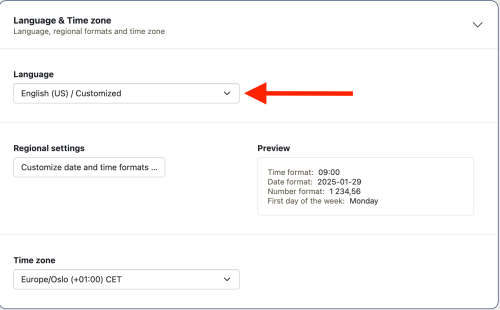
- Click on Language & Time Zone
 |
 |
- Click on the Language field and select Norwegian
- You will be prompted to reload the page to apply the change; click Reload
 |
 |
