Manage domains
Here you will find answers to the most common questions about managing your domain, including registrar settings for a domain, such as nameservers, the transfer lock, contact details, and renewal. For managing DNS settings, see DNS.
- Manage domains
General administration
You'll find everything for managing a single domain on its Manage page. This is where you handle registrar settings, while the separate DNS section handles records.
Our guide to DNS Players explains the difference between a registrar, DNS host, and web host if you are unsure which company controls each setting.
To get started:
- Log in to https://my.servetheworld.net
- Click Domains then My Domains
- Click Manage next to the relevant domain name
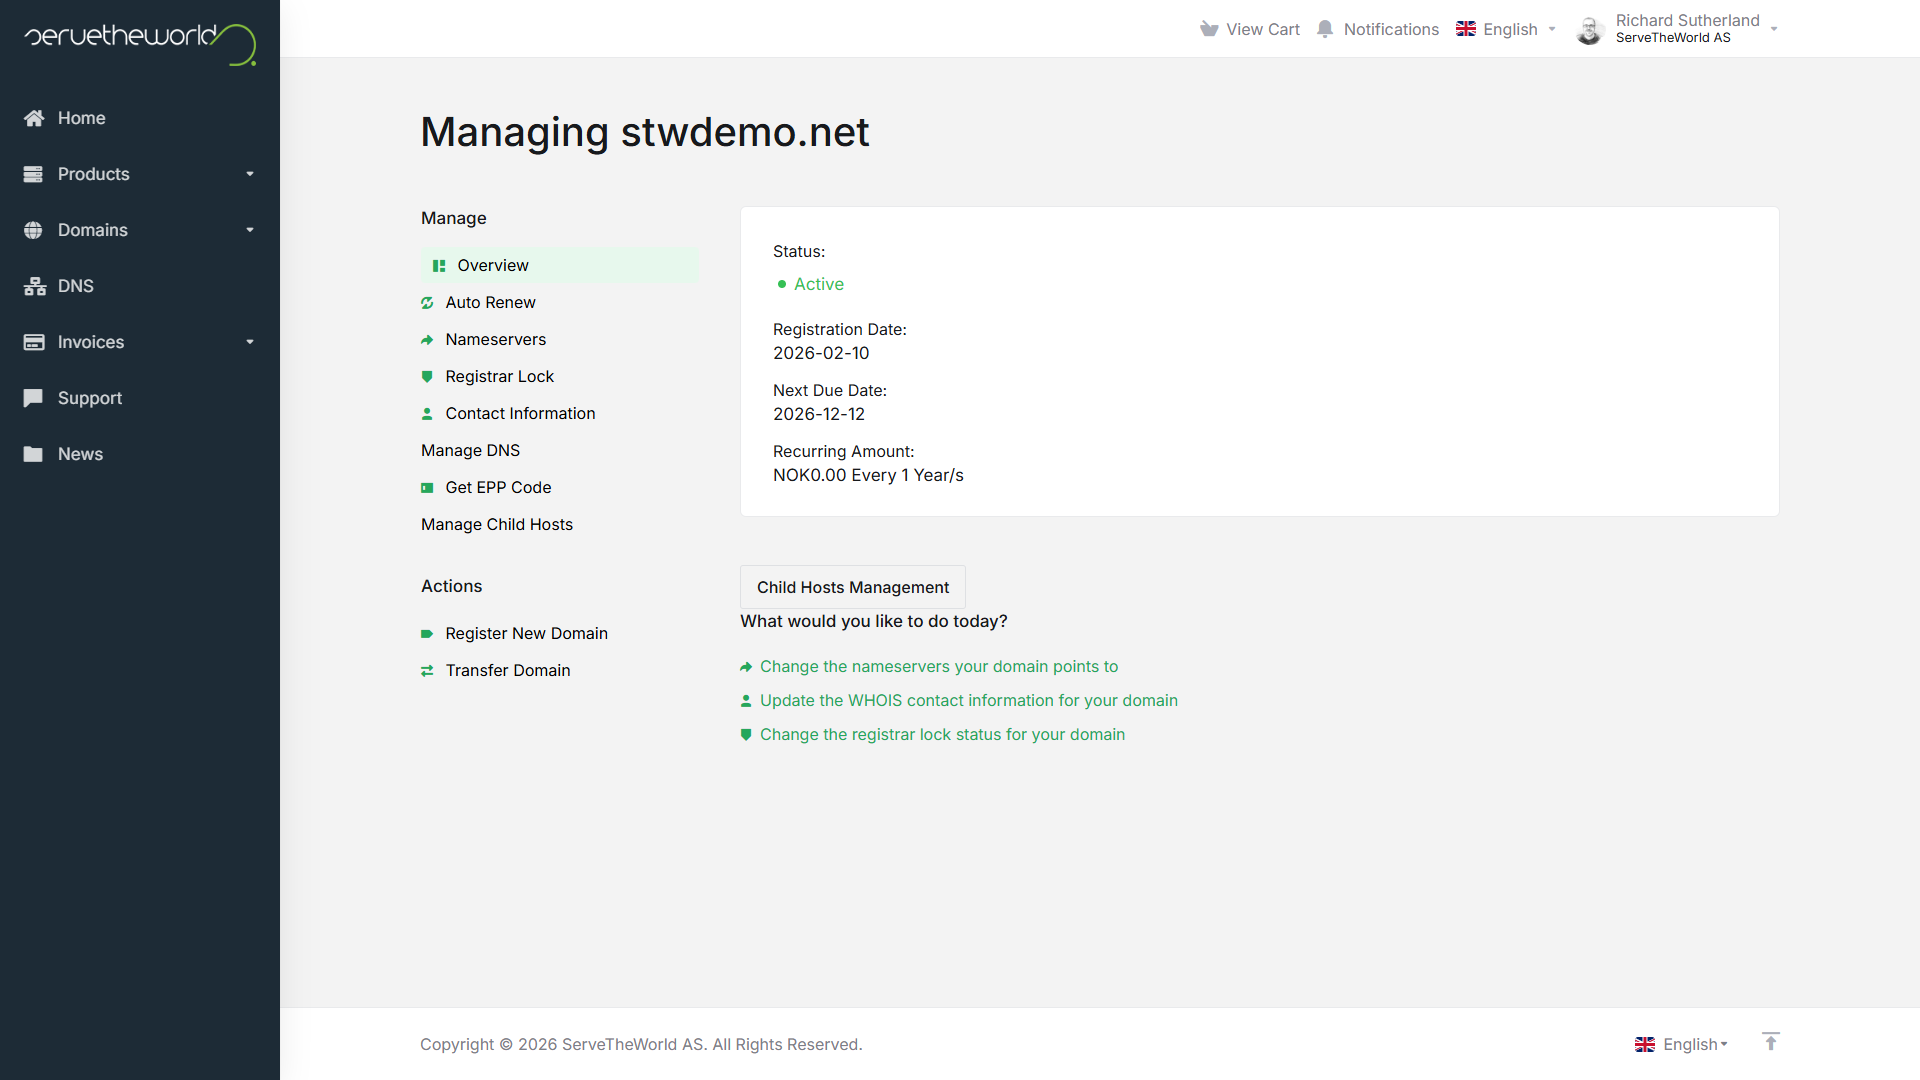
On the domain's Manage page you'll see:
- Overview — registration date, next due date, and status at a glance
- Auto Renew — turn automatic renewal on or off
- Nameservers — change where your domain points
- Registrar Lock — turn the transfer lock on or off
- Contact Information — update WHOIS owner and admin details
- Manage DNS — change DNS records
- Get EPP Code — retrieve the transfer code
- Manage Child Hosts — manage nameserver glue records
To add or change A, MX, CNAME, TXT, and other records, use the DNS item in the main menu rather than the domain's Manage page. See Manage DNS.
Change nameservers
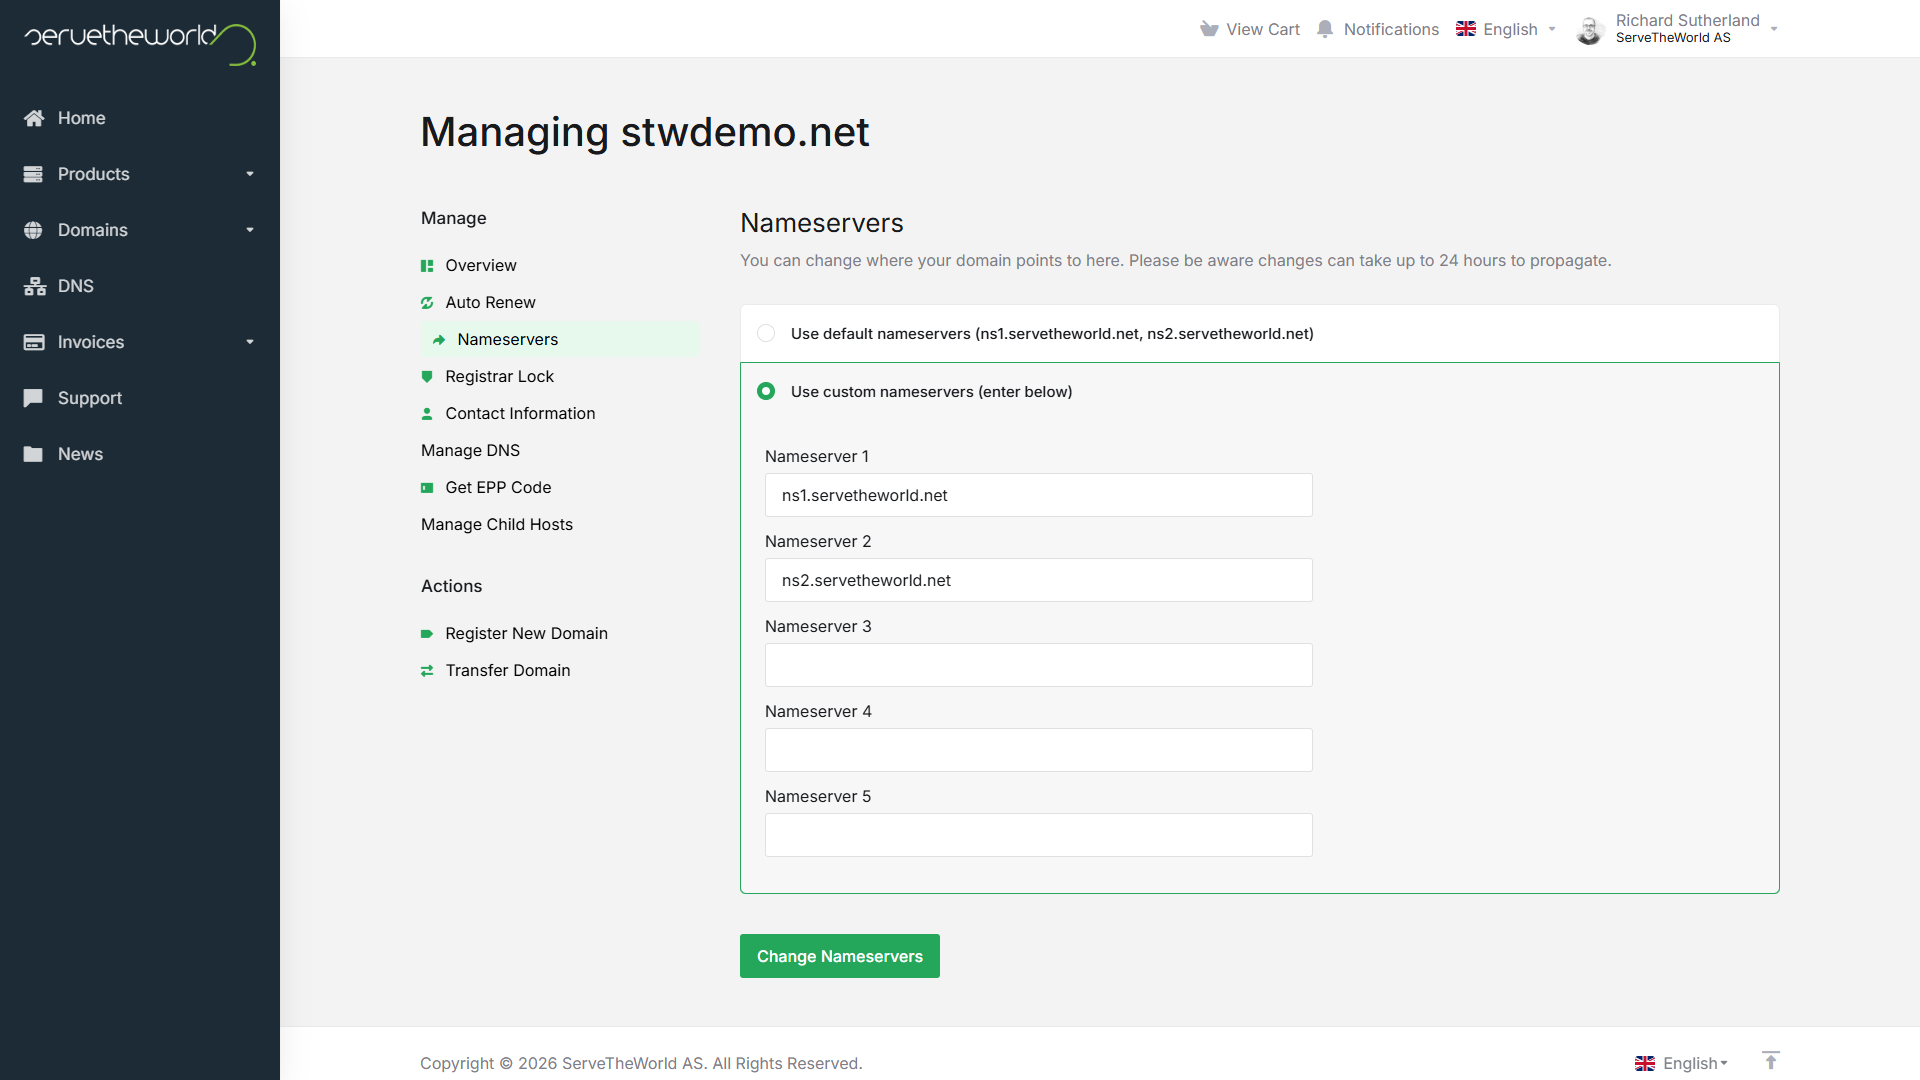
Nameservers decide which DNS provider answers for your domain. Point them at ServeTheWorld to use your STW DNS zone, or set another provider's nameservers here.
Our guide to DNS Players explains how nameservers connect your registrar to the company that hosts your DNS records.
- Log in to https://my.servetheworld.net
- Click Domains then My Domains
- Click Manage next to the relevant domain name
- Click Nameservers
- Choose Use default nameservers to let ServeTheWorld handle your DNS, or Use custom nameservers and enter them in the Nameserver 1–5 fields
- Click Change Nameservers
The default ServeTheWorld nameservers are ns1.servetheworld.net and ns2.servetheworld.net. Changes can take up to 24 hours to take effect across the internet.
For international domains such as .com and .net, you must remove the registrar lock before changing nameservers. See Manage registrar lock. For a .no domain, if you get an error after changing nameservers, make sure the receiving provider has created the zone file for your domain in their system first.
Order web hosting for an existing domain
If you already own a domain and want to add ServeTheWorld web and email hosting to it, you can order the package and then point the domain at us.
See Pointing a Domain for a fuller explanation of the A and CNAME records used to connect a domain to a website.
- Go to Products and choose Add Hosting or Add WordPress Hosting
- Choose the desired package and product billing cycle
- Select Use Own Domain, and enter your domain name
- Enter your payment details and complete the purchase
Domain name renewal
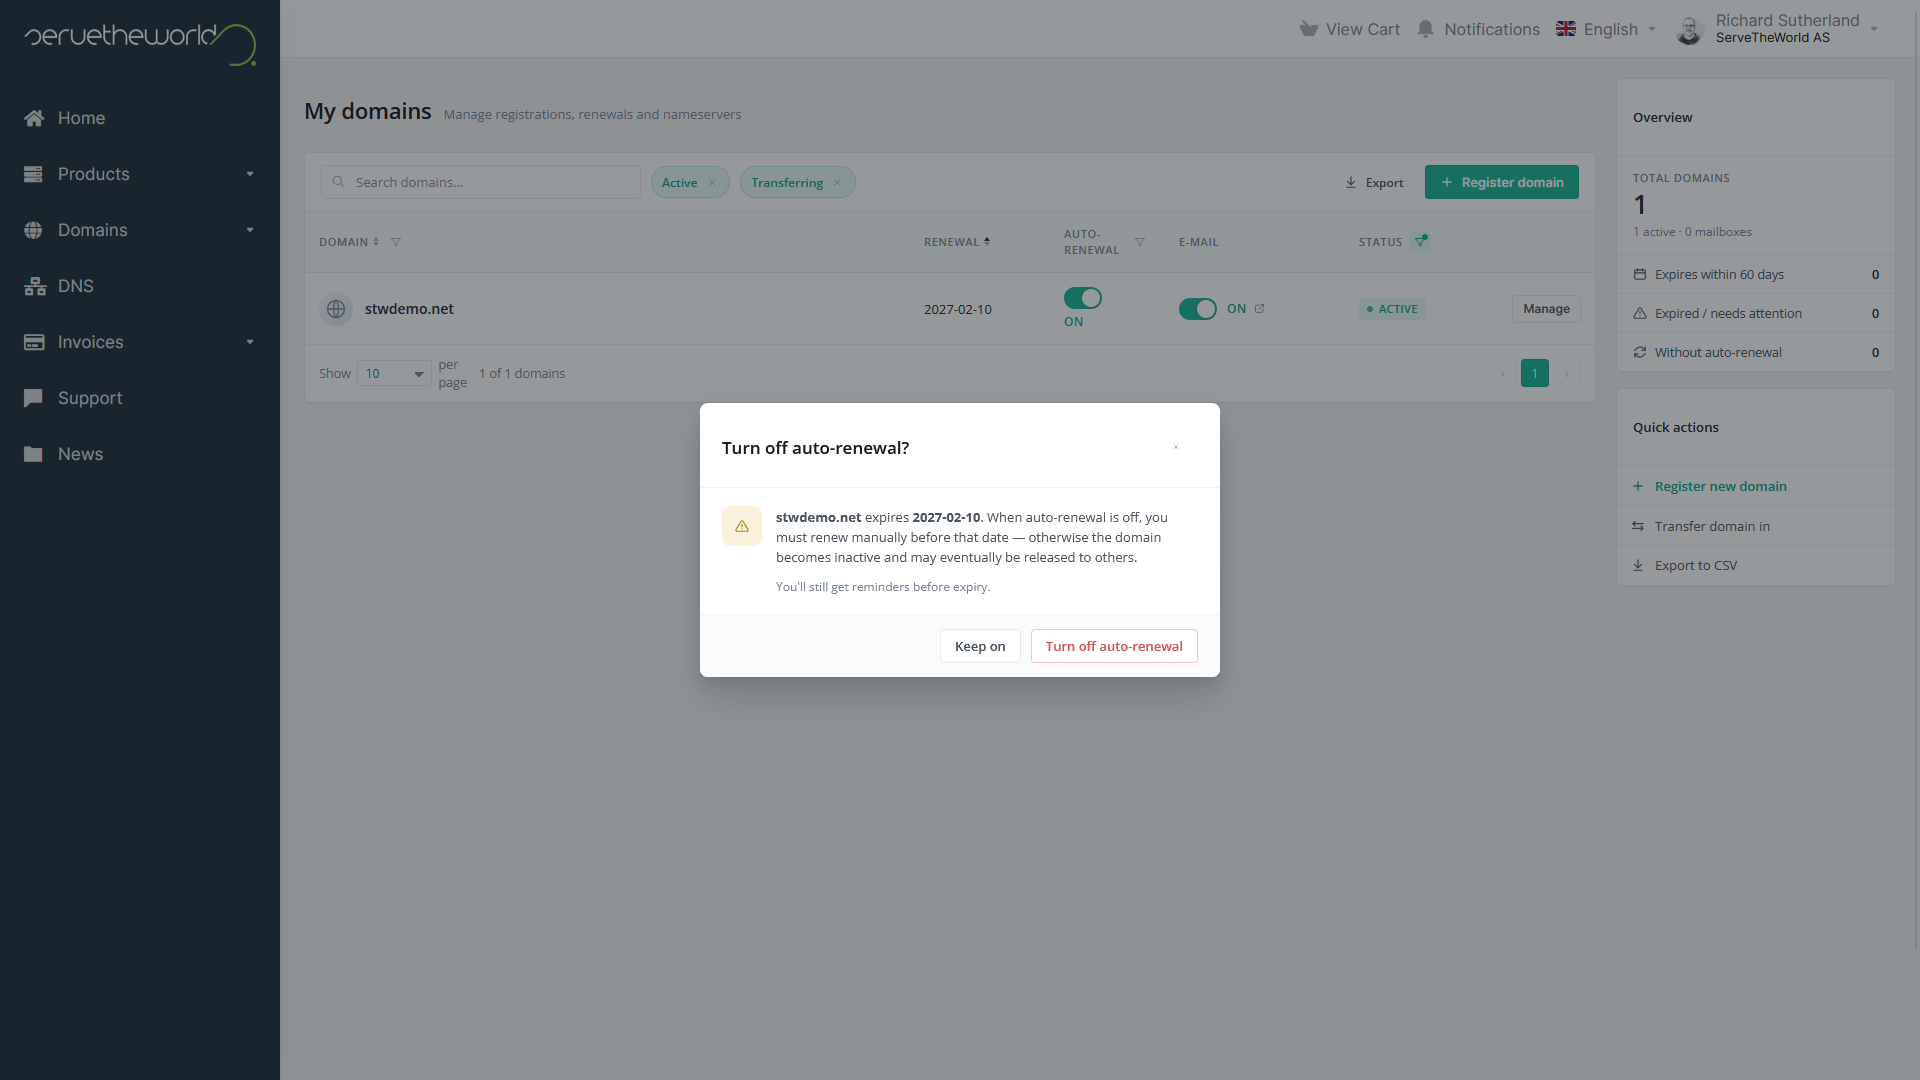
ServeTheWorld renews your domain automatically by default. You can turn this off if you don't want to keep the domain, in which case it expires after a set date and becomes available for others to register.
Turn automatic renewal on or off
- Log in to https://my.servetheworld.net
- Click Domains then My Domains
- Click the Auto-Renewal button next to the relevant domain name
- Select Turn off auto-renewal or turn on auto-renewal
With auto renew on, we send you a renewal invoice before the domain expires.
Renew a domain manually
To renew manually, pay the renewal invoice under Invoices. If you do not see one and want to renew early, contact support.
Transfer a domain name to ServeTheWorld
Transferring a domain moves its registration to ServeTheWorld so you manage and renew it with us. Before you start, check that the domain meets these conditions.
- The domain must have been registered for at least 60 days (does not apply to
.nodomains) - The domain has not been transferred within the last 60 days (does not apply to
.nodomains) - The domain must be unlocked for transfer (unlocked by your current provider)
- You need an authorization code (EPP code) from your current provider
- The contact information for the domain is correct (WHOIS). If you are unsure, contact your current provider
Update WHOIS contact information (WHOIS)
WHOIS is the public registration record for a domain. Keep it accurate so you don't miss renewal notices or risk losing control of the domain.
- Log in to https://my.servetheworld.net
- Click Domains then My Domains
- Click Manage next to the relevant domain name
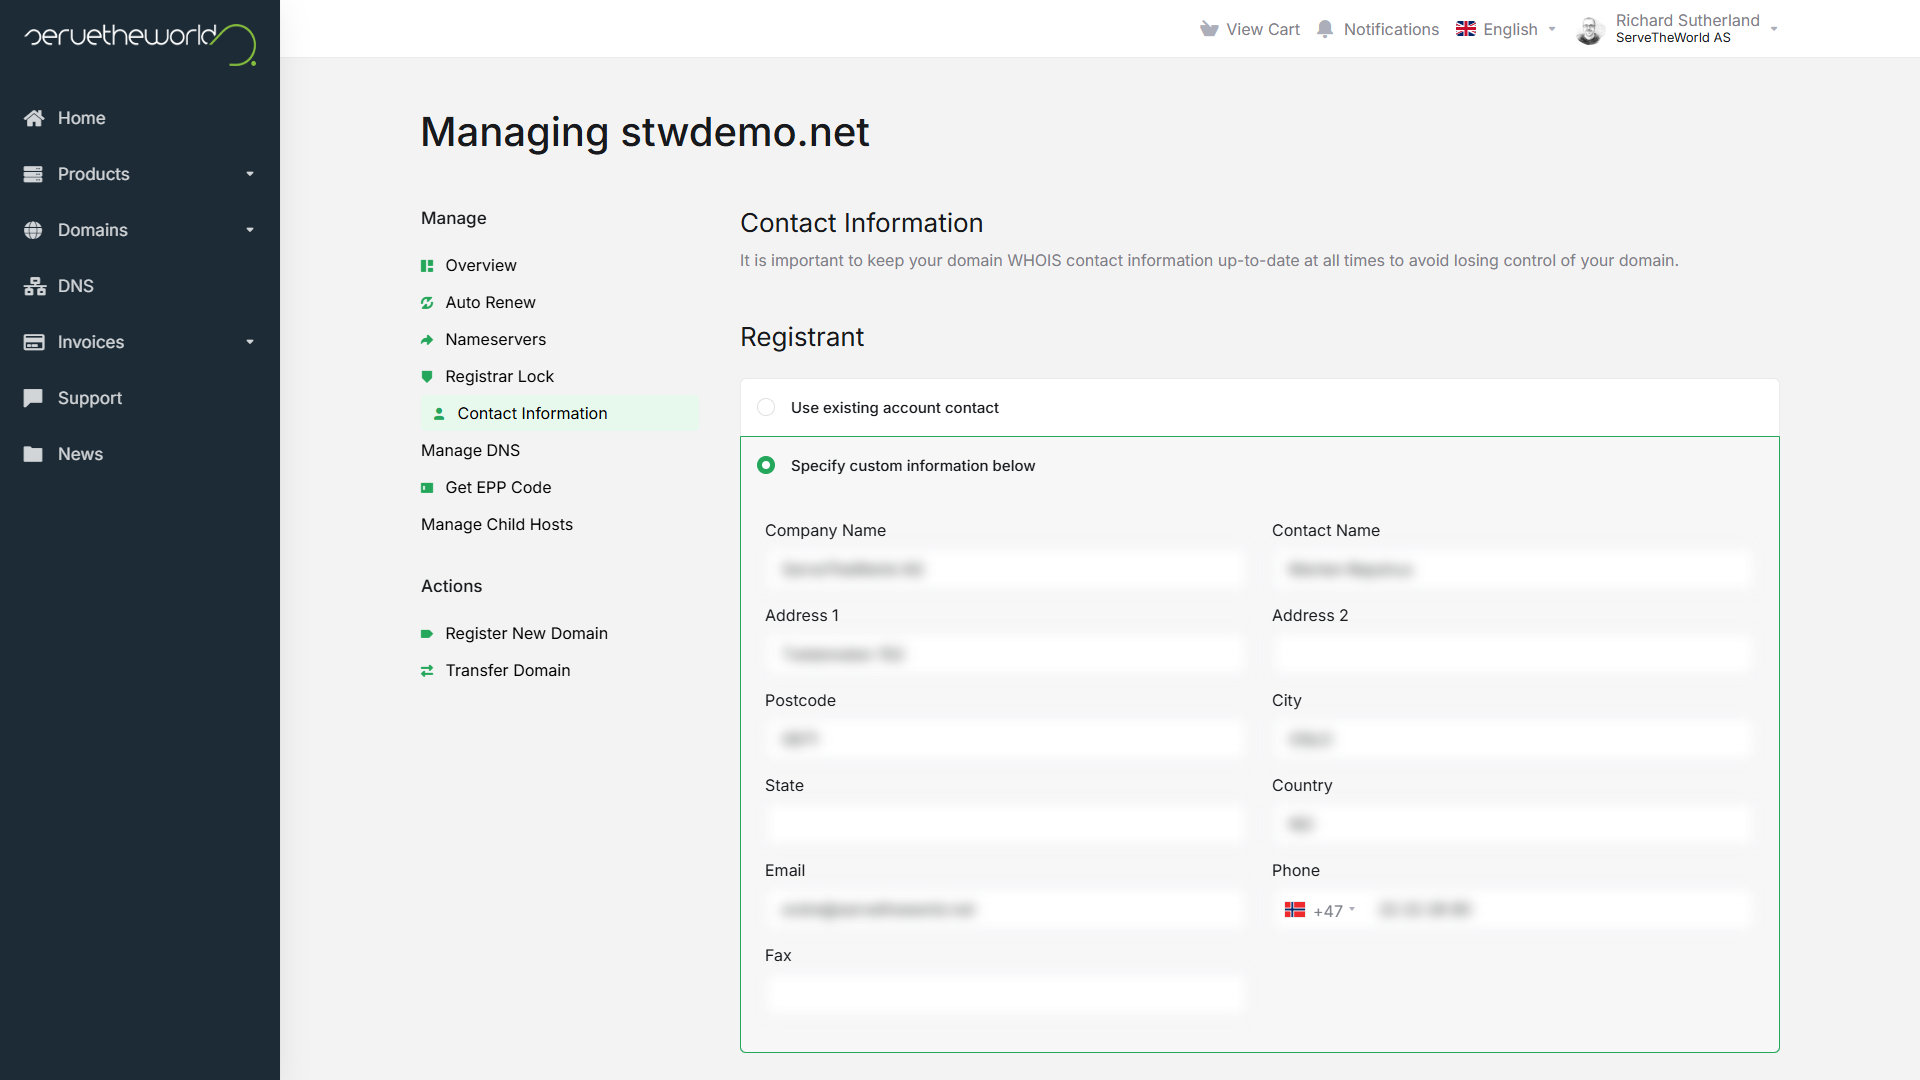
- Click Contact Information
- In the Registrant and Admin sections, choose Use existing account contact, or Specify custom information below and edit the fields
- Click Save changes
Changing the email address, first name, last name, or company may start a verification process for the registrant (domain owner). An email is sent to the old and new owner to confirm the change.
Authorization code for your domain name (transfer code)
The EPP code is essentially a password for your domain that a new registrar needs when you transfer your domain to them. It's sometimes called a transfer code or auth code.
- Log in to https://my.servetheworld.net
- Click Domains then My Domains
- Click Manage next to the relevant domain name
- Click Get EPP Code to display the transfer code
Treat the code like a password. Some domain types also require removing the registrar lock before you can transfer. See Manage registrar lock.
Manage registrar lock
The registrar lock blocks your domain from being transferred to another registrar. Keep it on, and turn it off only when you intend to transfer the domain away.
For more ways to protect your domain account and DNS, see DNS Security.
- Log in to https://my.servetheworld.net
- Click Domains then My Domains
- Click Manage next to the relevant domain name
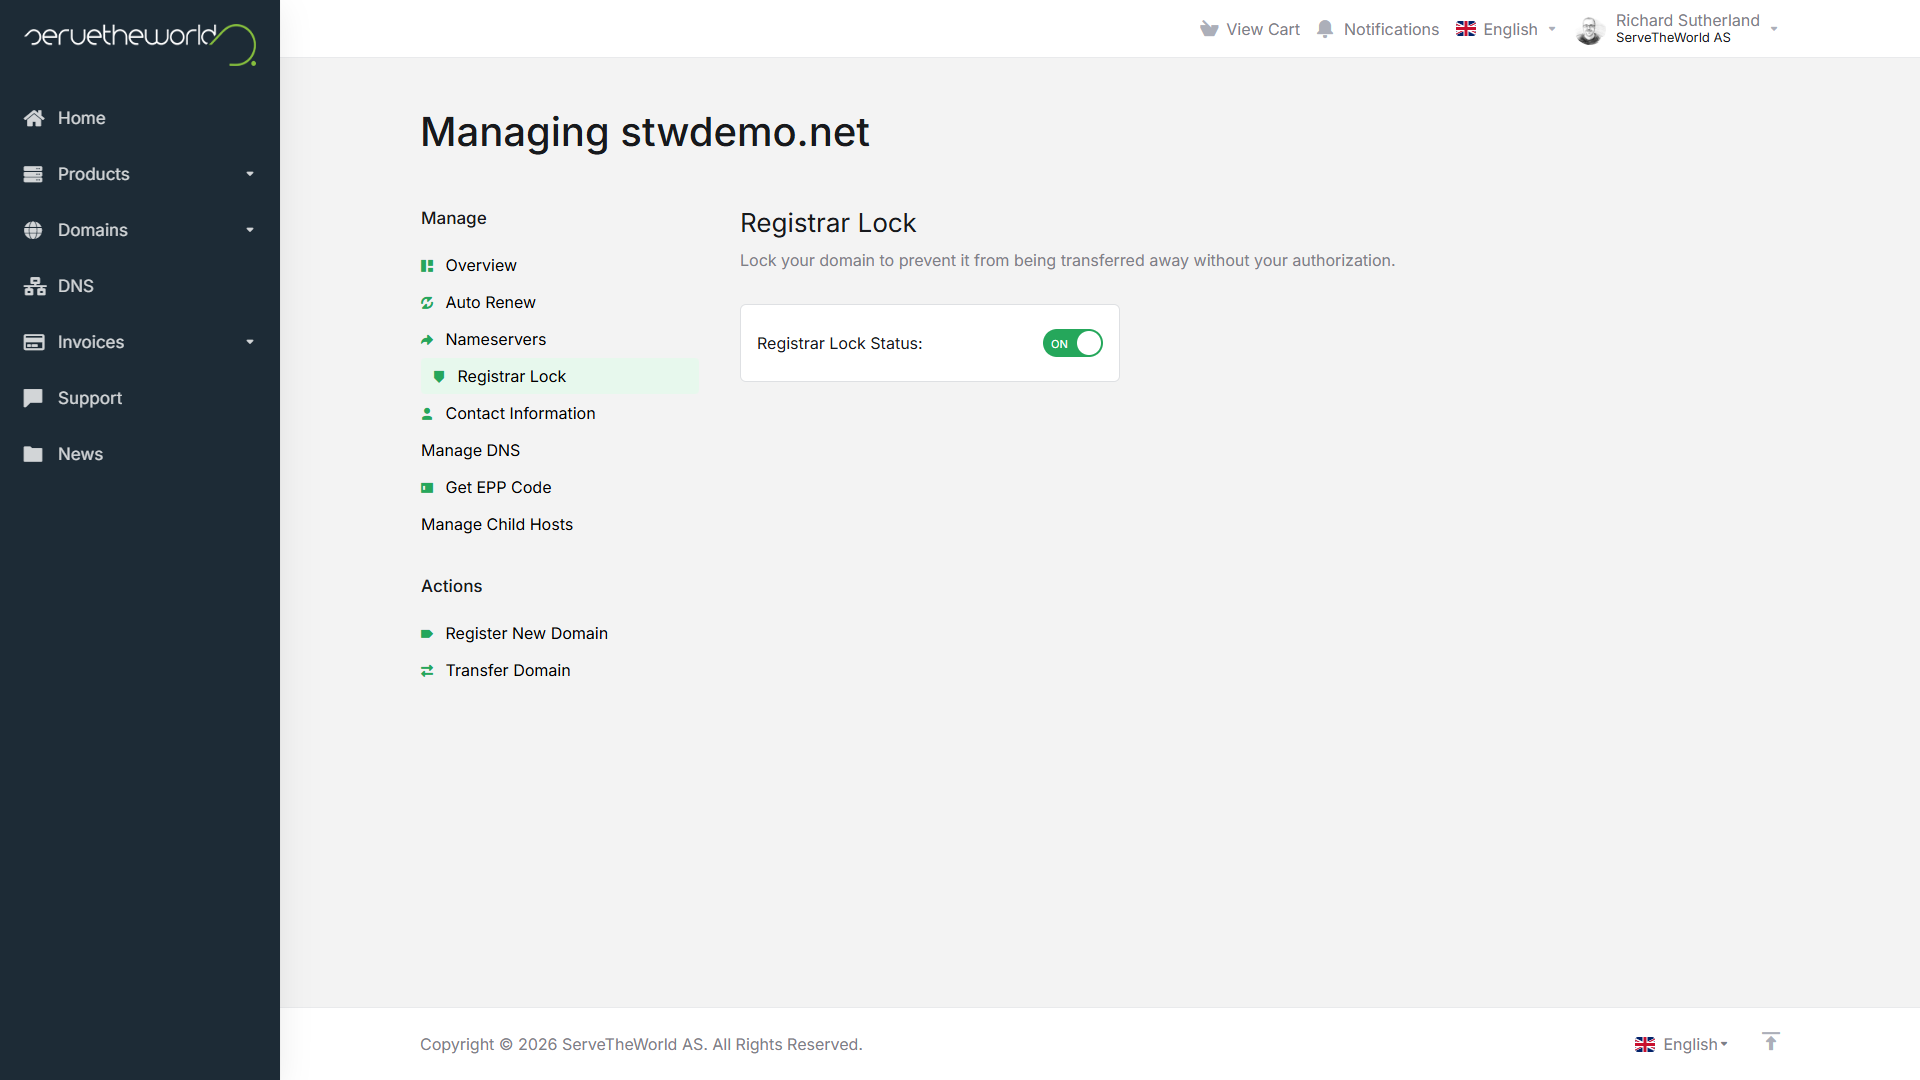
- Click Registrar Lock
- Use the Registrar Lock Status toggle to turn the lock off (to allow a transfer) or on (to block transfers)
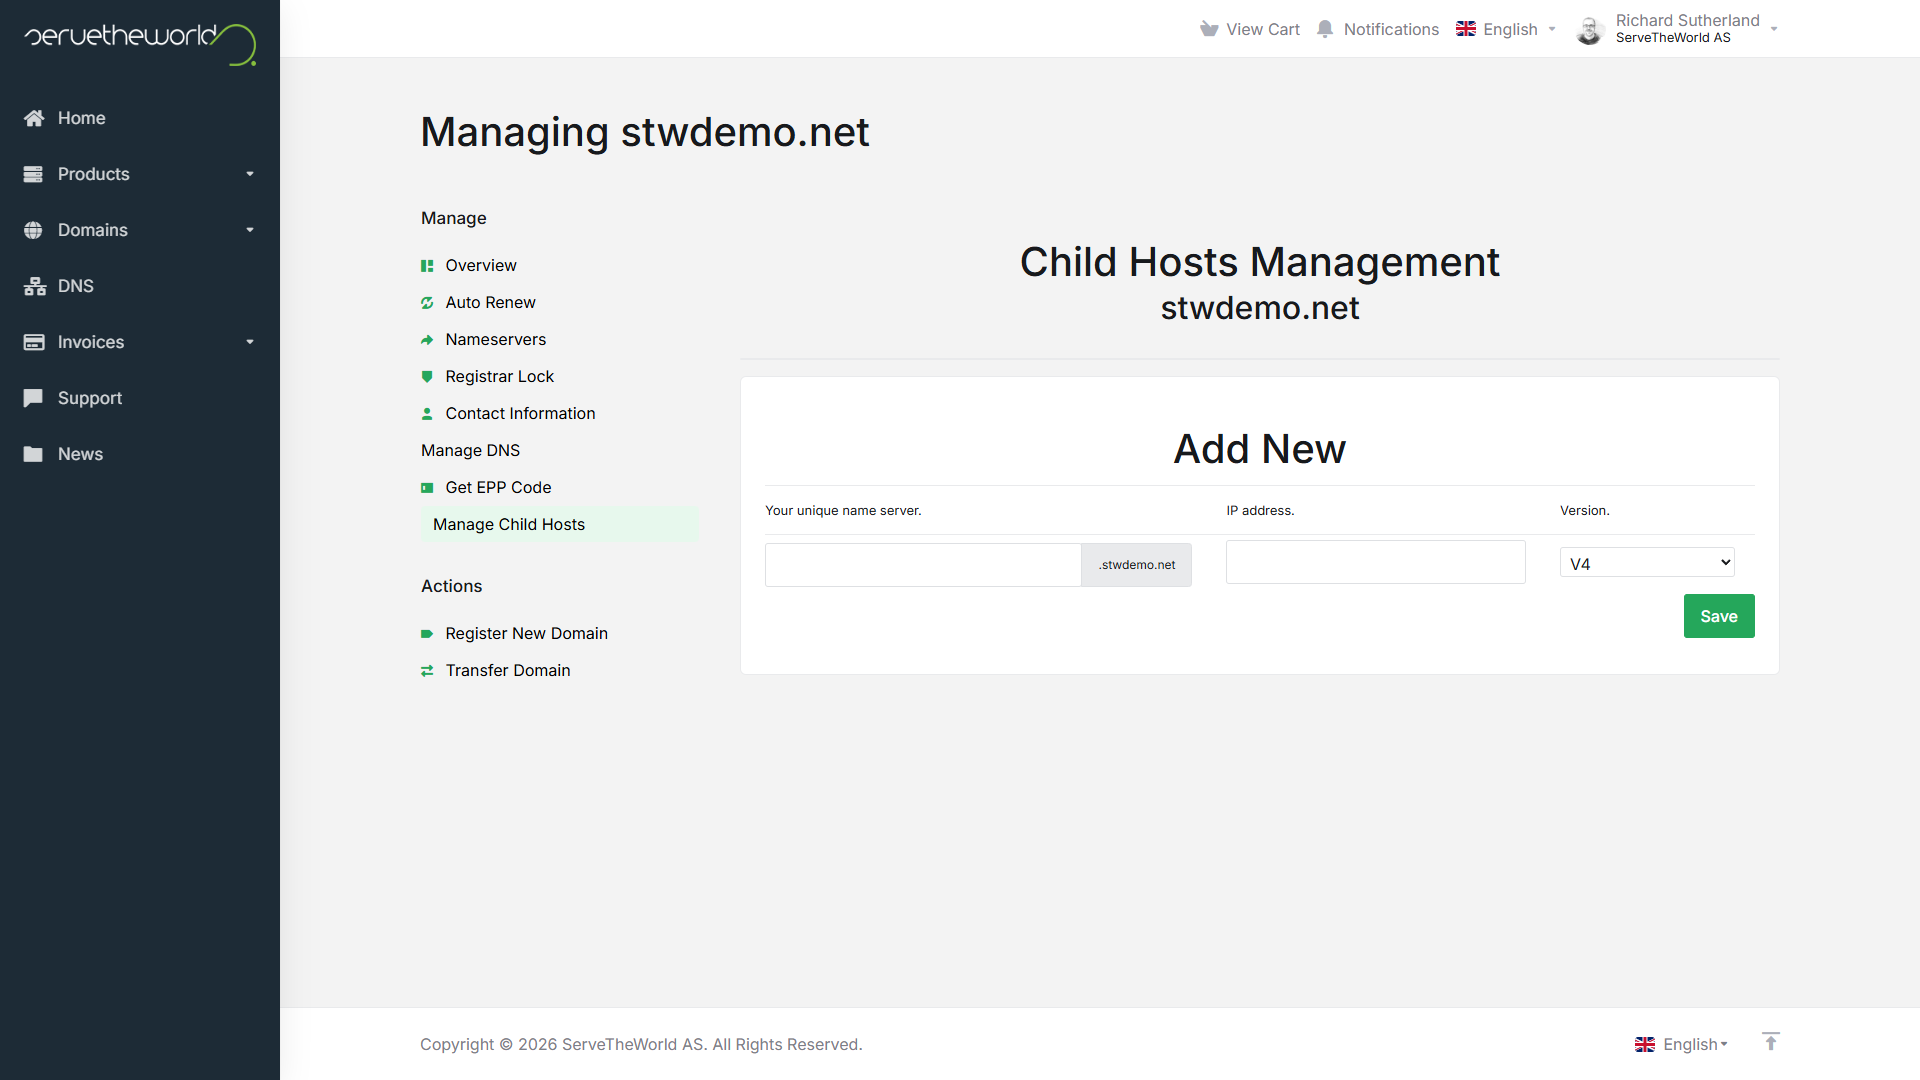
Manage child hosts (glue records)
A child host is a nameserver hostname that lives under your own domain, such as ns1.yourdomain.no. You only need one if you run your own branded nameservers.
- Log in to https://my.servetheworld.net
- Click Domains then My Domains
- Click Manage next to the relevant domain name
- Click Manage Child Hosts, then Add New
- Enter the nameserver hostname, its IP address, and choose the Version (V4 for IPv4, V6 for IPv6), then Save