Create an email account
Change password for an email account
Email forwarding
Set up auto-reply
Webmail
Create auto-reply in Webmail
Configure certificate for email connection
Spam filter
DKIM and SPF
Import/copy email from an external IMAP server
Email client setup for email on web hosting
General IMAP and POP setup in an email client on PC/phone)
IMAP account or POP account?
Outlook 2019
Apple Mail
iPhone / iPad
Thunderbird
Create an email account on web hosting
- Log in to https://my.servetheworld.net
- Click Products
- Click My Products
- Click Manage for the relevant web hosting plan
- Click Email
- Click Create Email Account
- Enter a name and a password for the new email account
- Click Create to complete
The email account is ready for use immediately.
Webmail is available at https://webmail.yourdomainname.no for the fastest access to receive and send email. Replace yourdomainname.no with your own domain (the part after the @ in your email address)
General setup in an email client on PC/phone
IMAP setup - your email is synchronized across all devices.
| Username | Your full email address, e.g. post@your-domain.no |
| Password | Your email password |
| IMAP server/host name | your-domain.no or mail.your-domain.no (Replace "your-domain.no" with your actual domain name) |
| IMAP port | 993 |
| IMAP connection | SSL/TLS |
| SMTP server/host name | your-domain.no or mail.your-domain.no (Replace "your-domain.no" with your actual domain name) |
| SMTP port | 465 |
| SMTP connection | SSL/TLS |
| SMTP authentication | Login or Password |
POP setup
| Username | Your full email address, e.g. post@your-domain.no |
| Password | Your email password |
| POP server/host name | your-domain.no or mail.your-domain.no (Replace "your-domain.no" with your actual domain name) |
| POP port | 995 |
| POP connection | SSL/TLS |
| SMTP server/host name | your-domain.no or mail.your-domain.no (Replace "your-domain.no" with your actual domain name) |
| SMTP port | 465 |
| SMTP connection | SSL/TLS |
| SMTP authentication | Login or Password |
IMAP account or POP account
You can choose which account type you want to set up in your email client on a PC or smartphone. Read about the differences below:
- Ideal if you want to read email on multiple computers and smartphones, as well as webmail
- Assumes that all email is stored on the server as it arrives.
- Folders and contents are synchronized to the mail server, and then synchronized to your other IMAP devices.
Change password for an email account in web hosting (2 options)
Option 1: You have a working password and want to change it.
- Log in to your email account at https://webmail.your-domain-name (Note: replace your-domain-name with your own domain name)
- Example: Your domain name is example.no. The webmail address will be webmail.example.no
- After logging in, click Settings (or Options if you have Windows web hosting)
- Click Password (or Login if you have Windows web hosting)
- Fill in the password fields
- Click Save


Option 2: You have forgotten your current password.
- The web hosting administrator must log in to https://my.servetheworld.net
- Click Products
- Click My Products
- Click Manage for the relevant web hosting plan
- Click Email
- Click the Edit icon to the right of the relevant email account to change the password
- Enter the password in the New Password field
- Click Save
Email forwarding in web hosting
- Log in to https://my.servetheworld.net
- Click Products
- Click My Products
- Click Manage for the relevant web hosting plan
- Click Email Forwarding
- Click Create email forwarding
- Enter the address and destination (use a comma to separate multiple destination addresses)
Set up auto-reply in web hosting
- Log in to https://my.servetheworld.net
- Click Products
- Click My Products
- Click Manage for the relevant web hosting plan
- Click *Plesk
- Go to Mail
- Click the relevant email account
- Go to the Auto-Reply tab
- Tick Switch on auto-reply
- Customize your auto-reply
- Click OK to save, and test your auto-reply by sending an email to your own address
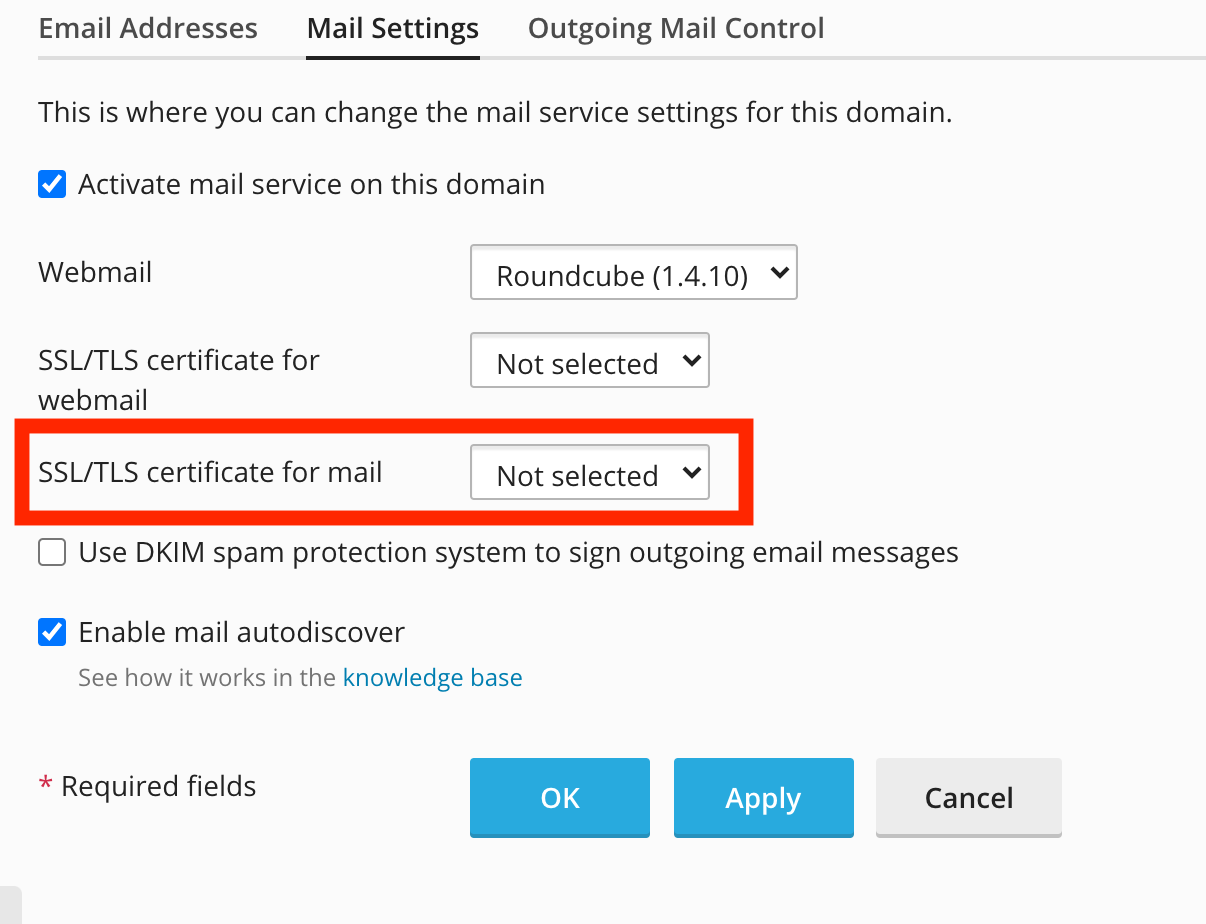
Configure certificate for email connection in web hosting
How to set up a valid certificate for email connections (IMAP, POP, SMTP).
- Log in to https://my.servetheworld.net
- Click Products
- Click My Products
- Click Manage for the relevant web hosting plan
- Click Plesk
- Go to Mail
- Click Mail Settings
- Click the relevant domain name
- Select the certificate in the SSL/TLS certificate for mail field (see image below)
- Click OK or Apply to save
DKIM and SPF records in web hosting
DKIM and SPF can improve email delivery by authenticating email and confirming the sender’s identity. This increases trust with receiving mail servers and reduces the likelihood that email ends up in spam.
DKIM and SPF for your domain name are created automatically for all domains with an active email service. The DNS record for SPF looks like this, for example:
v=spf1 a mx include:_spf.stwcp.net ~allHow to check the DKIM setup for your domain name:
- Log in to https://my.servetheworld.net
- Click Products
- Click My Products
- Click Manage for the relevant web hosting plan
- Click Plesk
- Go to Mail
- Click Mail Settings
- Click the relevant domain name
- Make sure the box is checked for Use DKIM spam protection system to sign outgoing email messages
- Click Apply to save changes
-
When DKIM is enabled, you can find the DNS records by clicking How to configure external DNS
-
If your domain name uses ServeTheWorld nameservers, the DKIM DNS records will be added automatically to your domain name.
Import/copy email in web hosting from an external IMAP server
- Log in to https://my.servetheworld.net
- Click Products
- Click My Products
- Click Manage for the relevant web hosting plan
- Click Plesk
- Click the Mail tab
- Click Mail Importing
- Click Import mail messages
- Click Show advanced options
Fill in the following:
- Source email - your email address
- Source password - your password
- Import to - Select an existing email account or create a new email account (if you choose new, you must enter a Destination email and password)
- Source IMAP host - Enter the IMAP mail server. If you are unsure, contact your email provider
- Source IMAP port - Enter the IMAP port. If you are unsure, contact your email provider
- Click OK to start the import/copy of email
 |
 |